It’s important to create a. Branding 101: Use your business name. Setting up a business Page is simple and free, and it looks great on both desktop and mobile. You need to be logged into the business page and have admin privileges.
Go to Commerce Manager. In the Start Setting Up Your Shop section , select Your Website.
This Page is what you will use to stream and build an audience. Enter a name for your Page. Plan, monitor, and analyze your accounts in one place while reaching new customers. An like million users, use Odoo to find new customers and keep them engaged. When creating your page, you’ll have the option to choose between a business page and a public.
This image will show next to your posts when you update your business page. Do this only after you are done customizing your page—you want them to see it at its best. While you can create more than one business page , they should all link to one personal account.
When logged in, click the dropdown arrow in the top right corner.
Create a business page. You rather have to join and maximize the reach. In this guide, we will take you by hand and show. This is a complete, in-depth, and easy-to-follow paced tutorial. This can help your business page stand out and attract more prospects that might be willing to give your business a try.
Click it and select “Page”. Just to your account, and with some basic information about your company, you can get started. Once there, you’ll see two options — “Business or Brand” and “Community and Public Figure”. Take a look at the main categories of the Pages and decide which one fits your business. Additionally, the content within the linked article should have relevant keywords.
Alternatively, you can also “Settings” and “ Page Info” to fill out your Page information. Share some posts to your Business Page , or make a few original posts. After you’ve filled in the information, click “Get Started” to create your new Page.
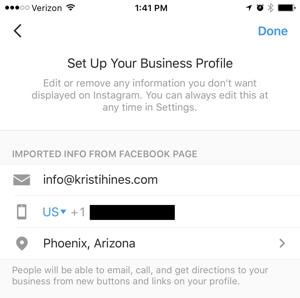
Our new Page looks a little barren, so it’s time to customize things. We’ll spruce things up with a cover photo, profile picture, username, and a description. You can set a number of different roles, each with different permissions. At this stage, your Page is now published and your customers will be able to find you (wahoo!) but you’ll need to add a bit more info to really provide value and start getting the most out of your page.
Next, click “Add a Short Description” and enter a few sentences that describe the purpose of your Page.
When you’re done, click the “Save” button. Now the Page is really starting to take shape, so it’s time to get a few fans. It is also very user-friendly, and reaches a wide audience. You’ll first create the page , then add visual elements, choose the. However, if you do not have a business address you are comfortable with sharing with the public, you’ll want to select “Public Figure”.
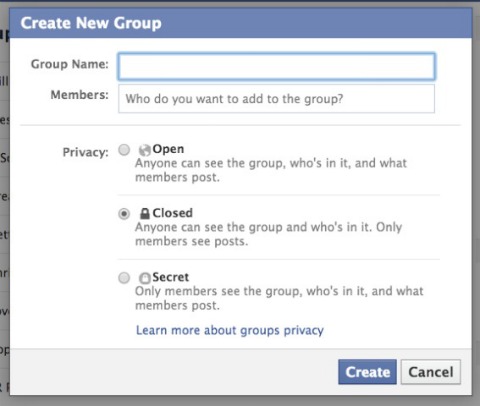
First, Set Everything Up Properly. You can control who sees your Page and posts, as well as view and edit your list of admins—the people who can make changes to your Page.